Category: Vegetarian

Roasted Vegetables with Garlic Scape/Carrot Top Pesto


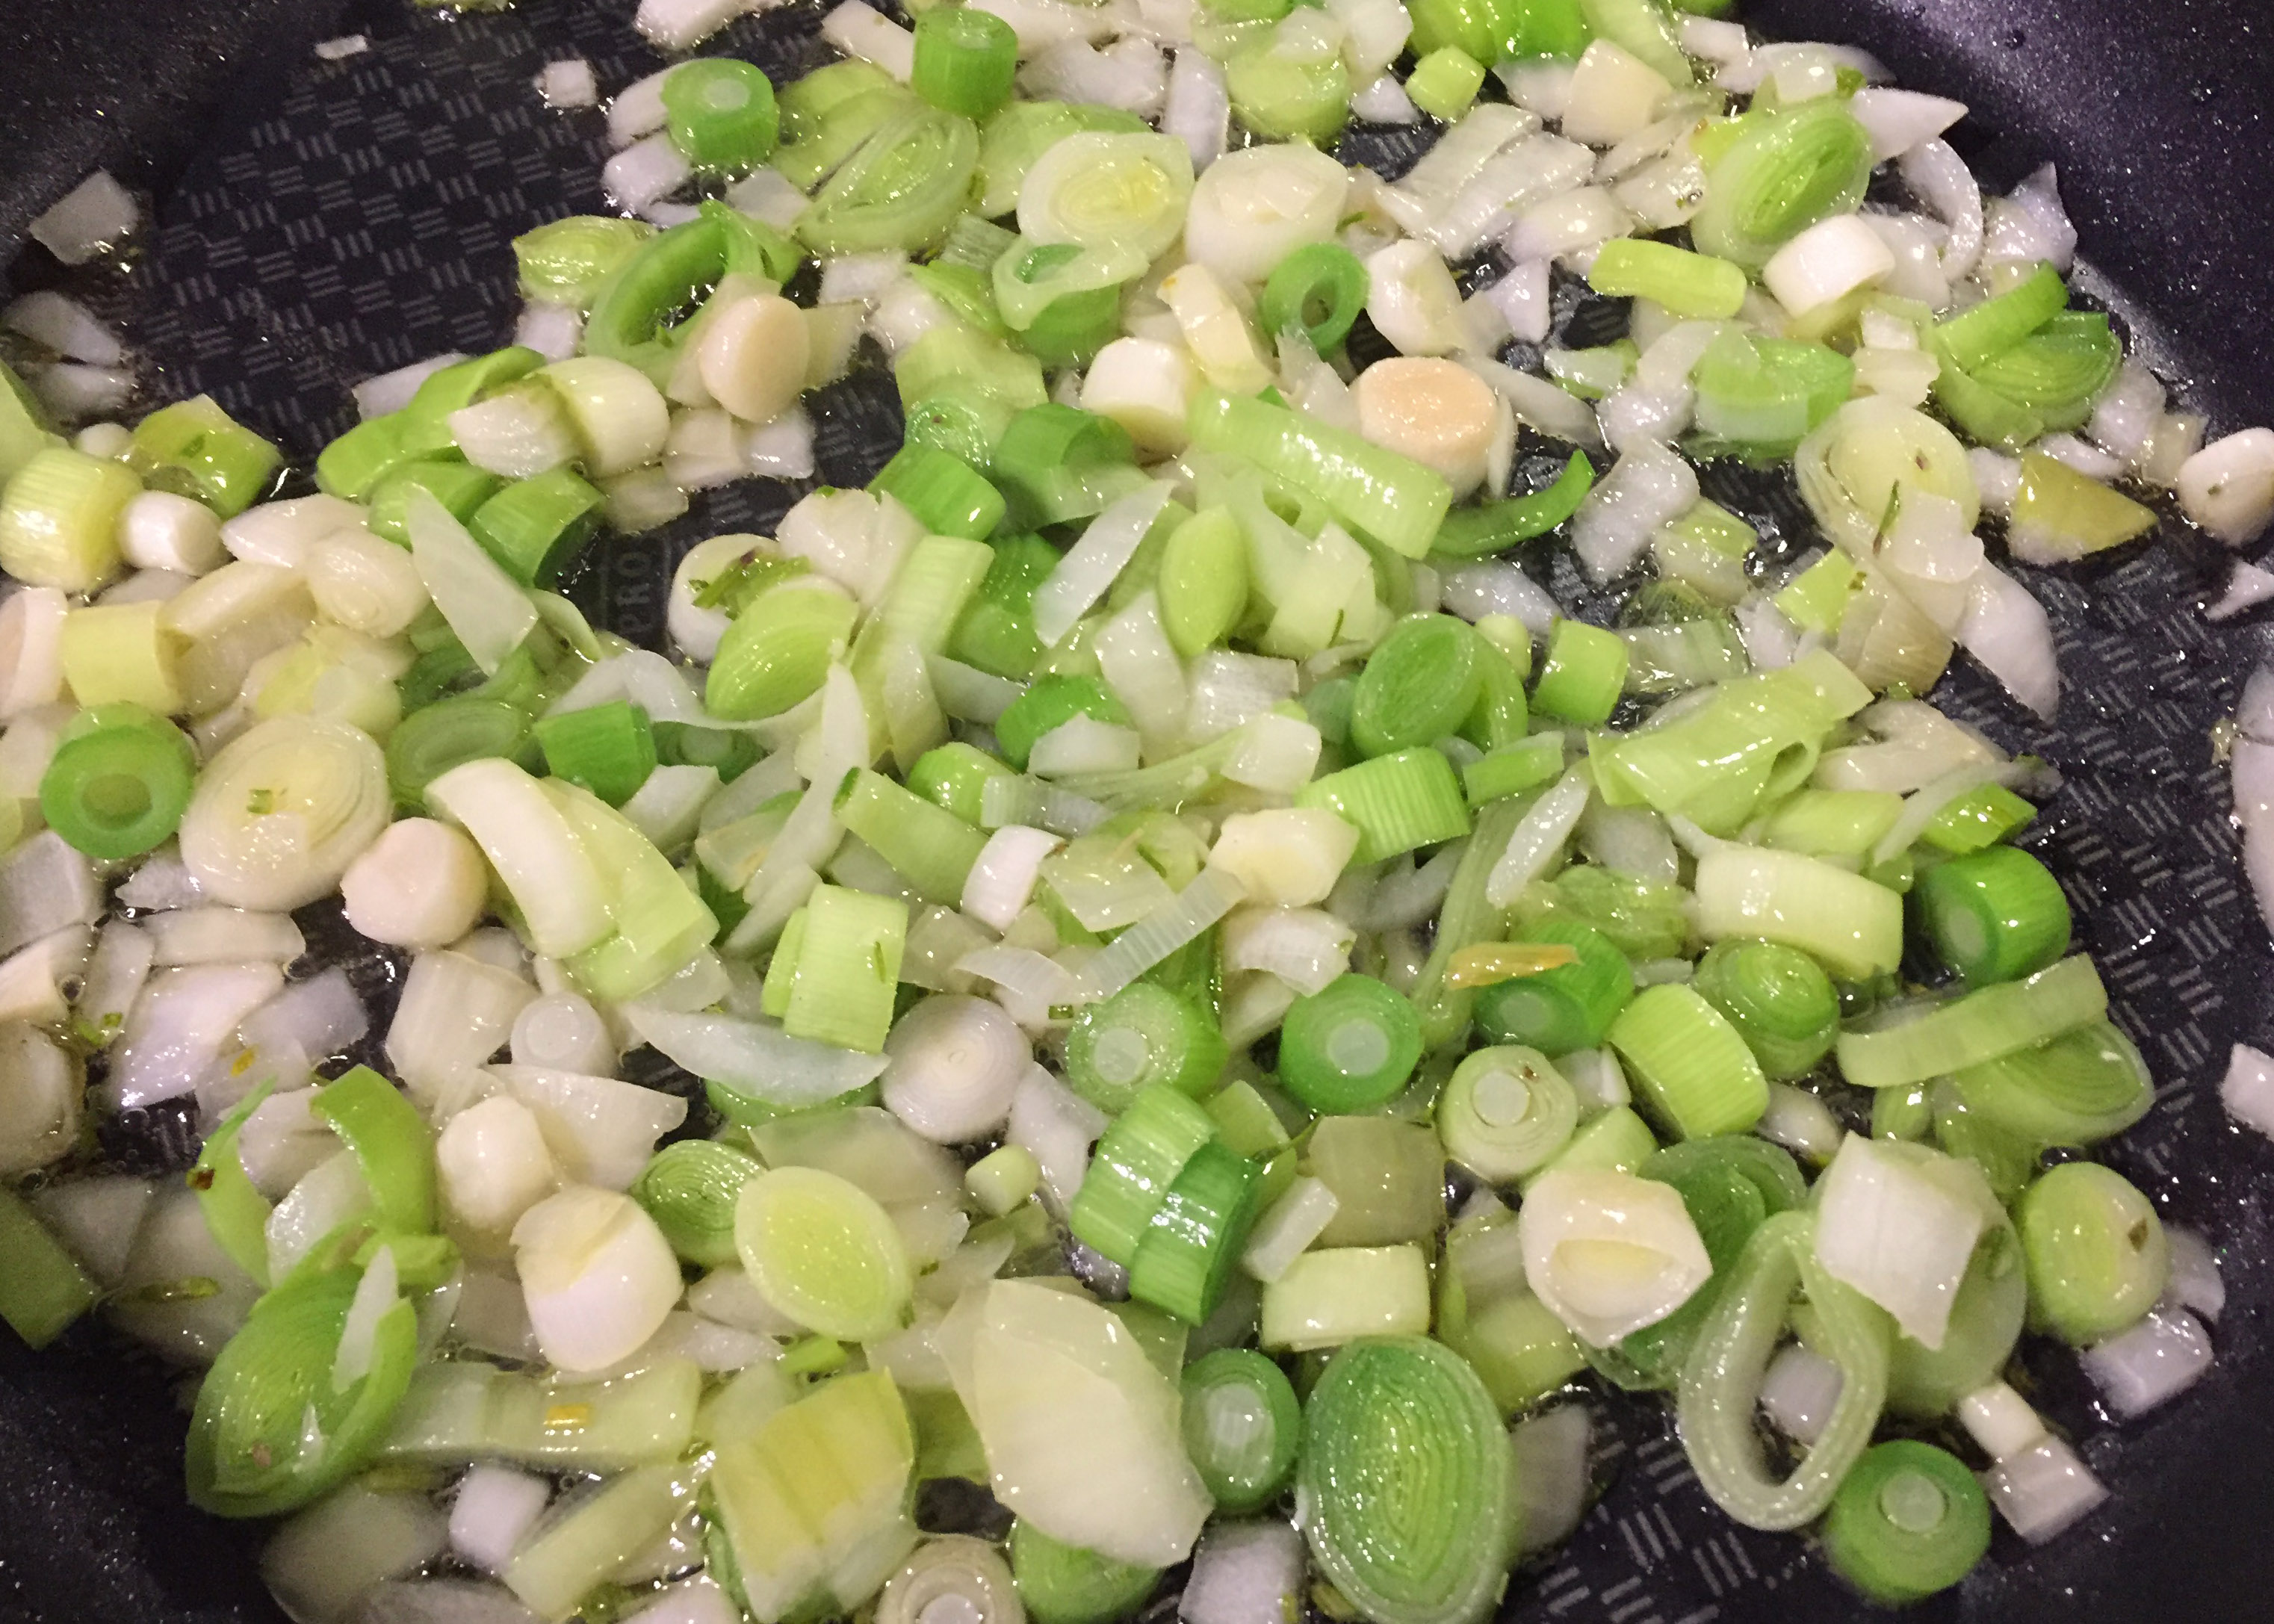
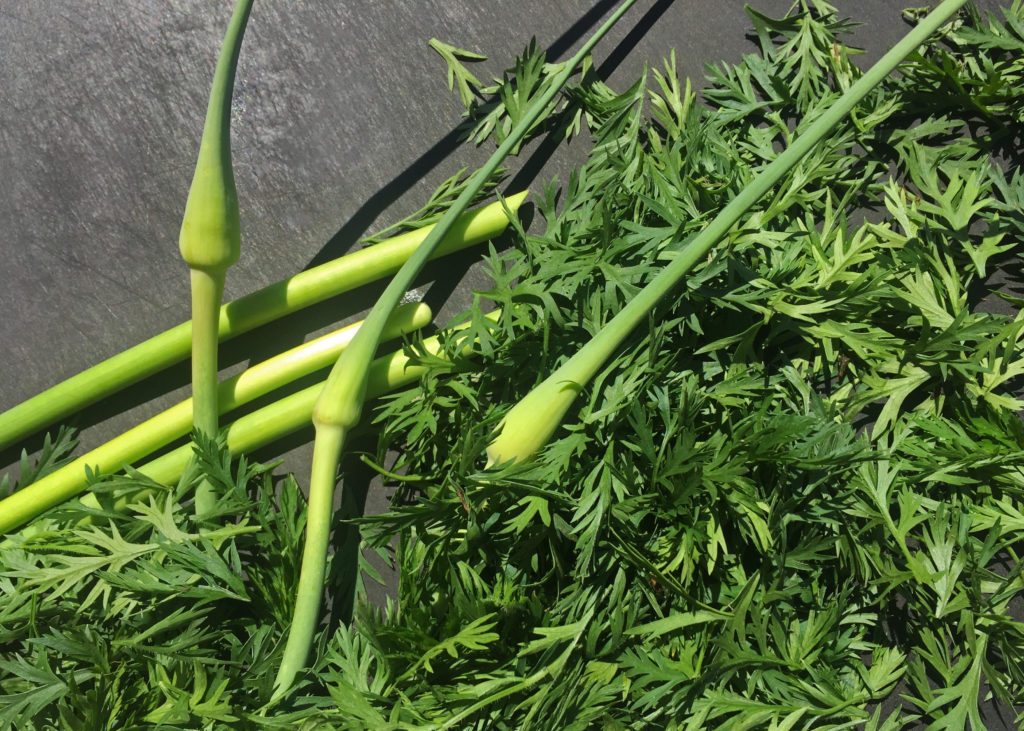
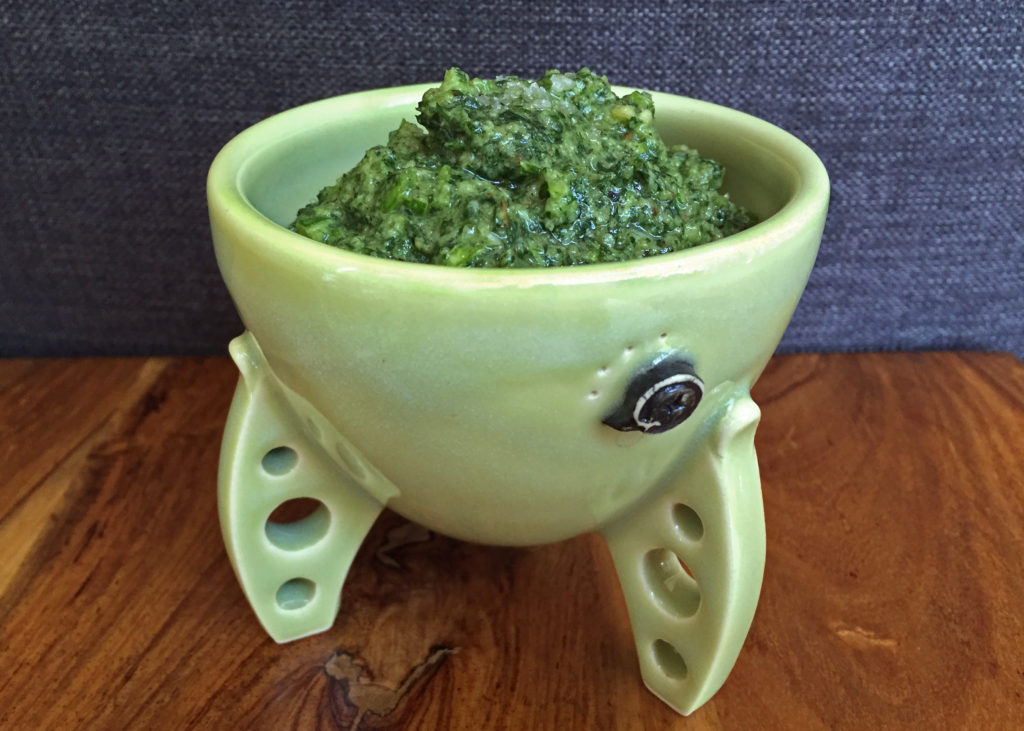
Have you heard?!?! It’s garlic scape season… YAY! Garlic scapes are the flower stalks that emerge from the garlic plant in the late spring and early summer and they are packed with flavour. They are removed from the plant so the energy that would go to letting the plant flower goes instead to the bulb in the ground. The season for scapes is very short, only a couple weeks, so grab yours while you can! I grow garlic in my backyard (easier than you think… you should try it) but the fresh scapes are also easy to find at your local farmers’ market. Grilling them for a minute or so on each side until they start to blister really mellows the flavour (I chop them up and use them in salads), but fresh scapes in pesto is a perfect substitute for garlic cloves. They add a very bright, green zing to the pesto and the lingering effect is much softer than cloves… perfect for serving to company!

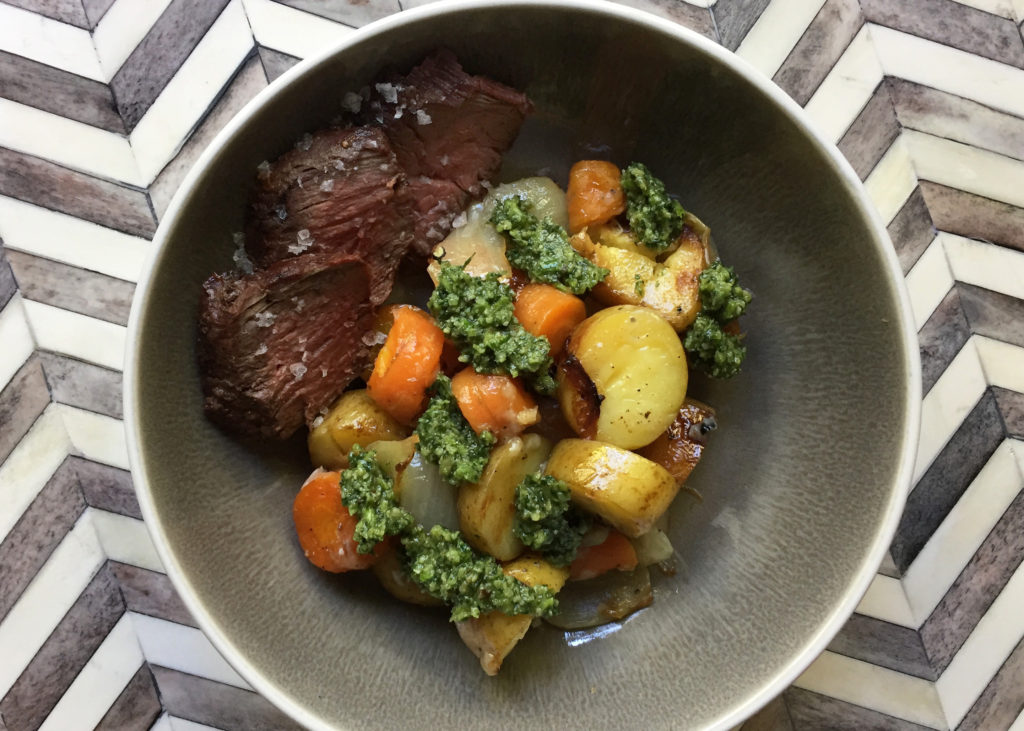
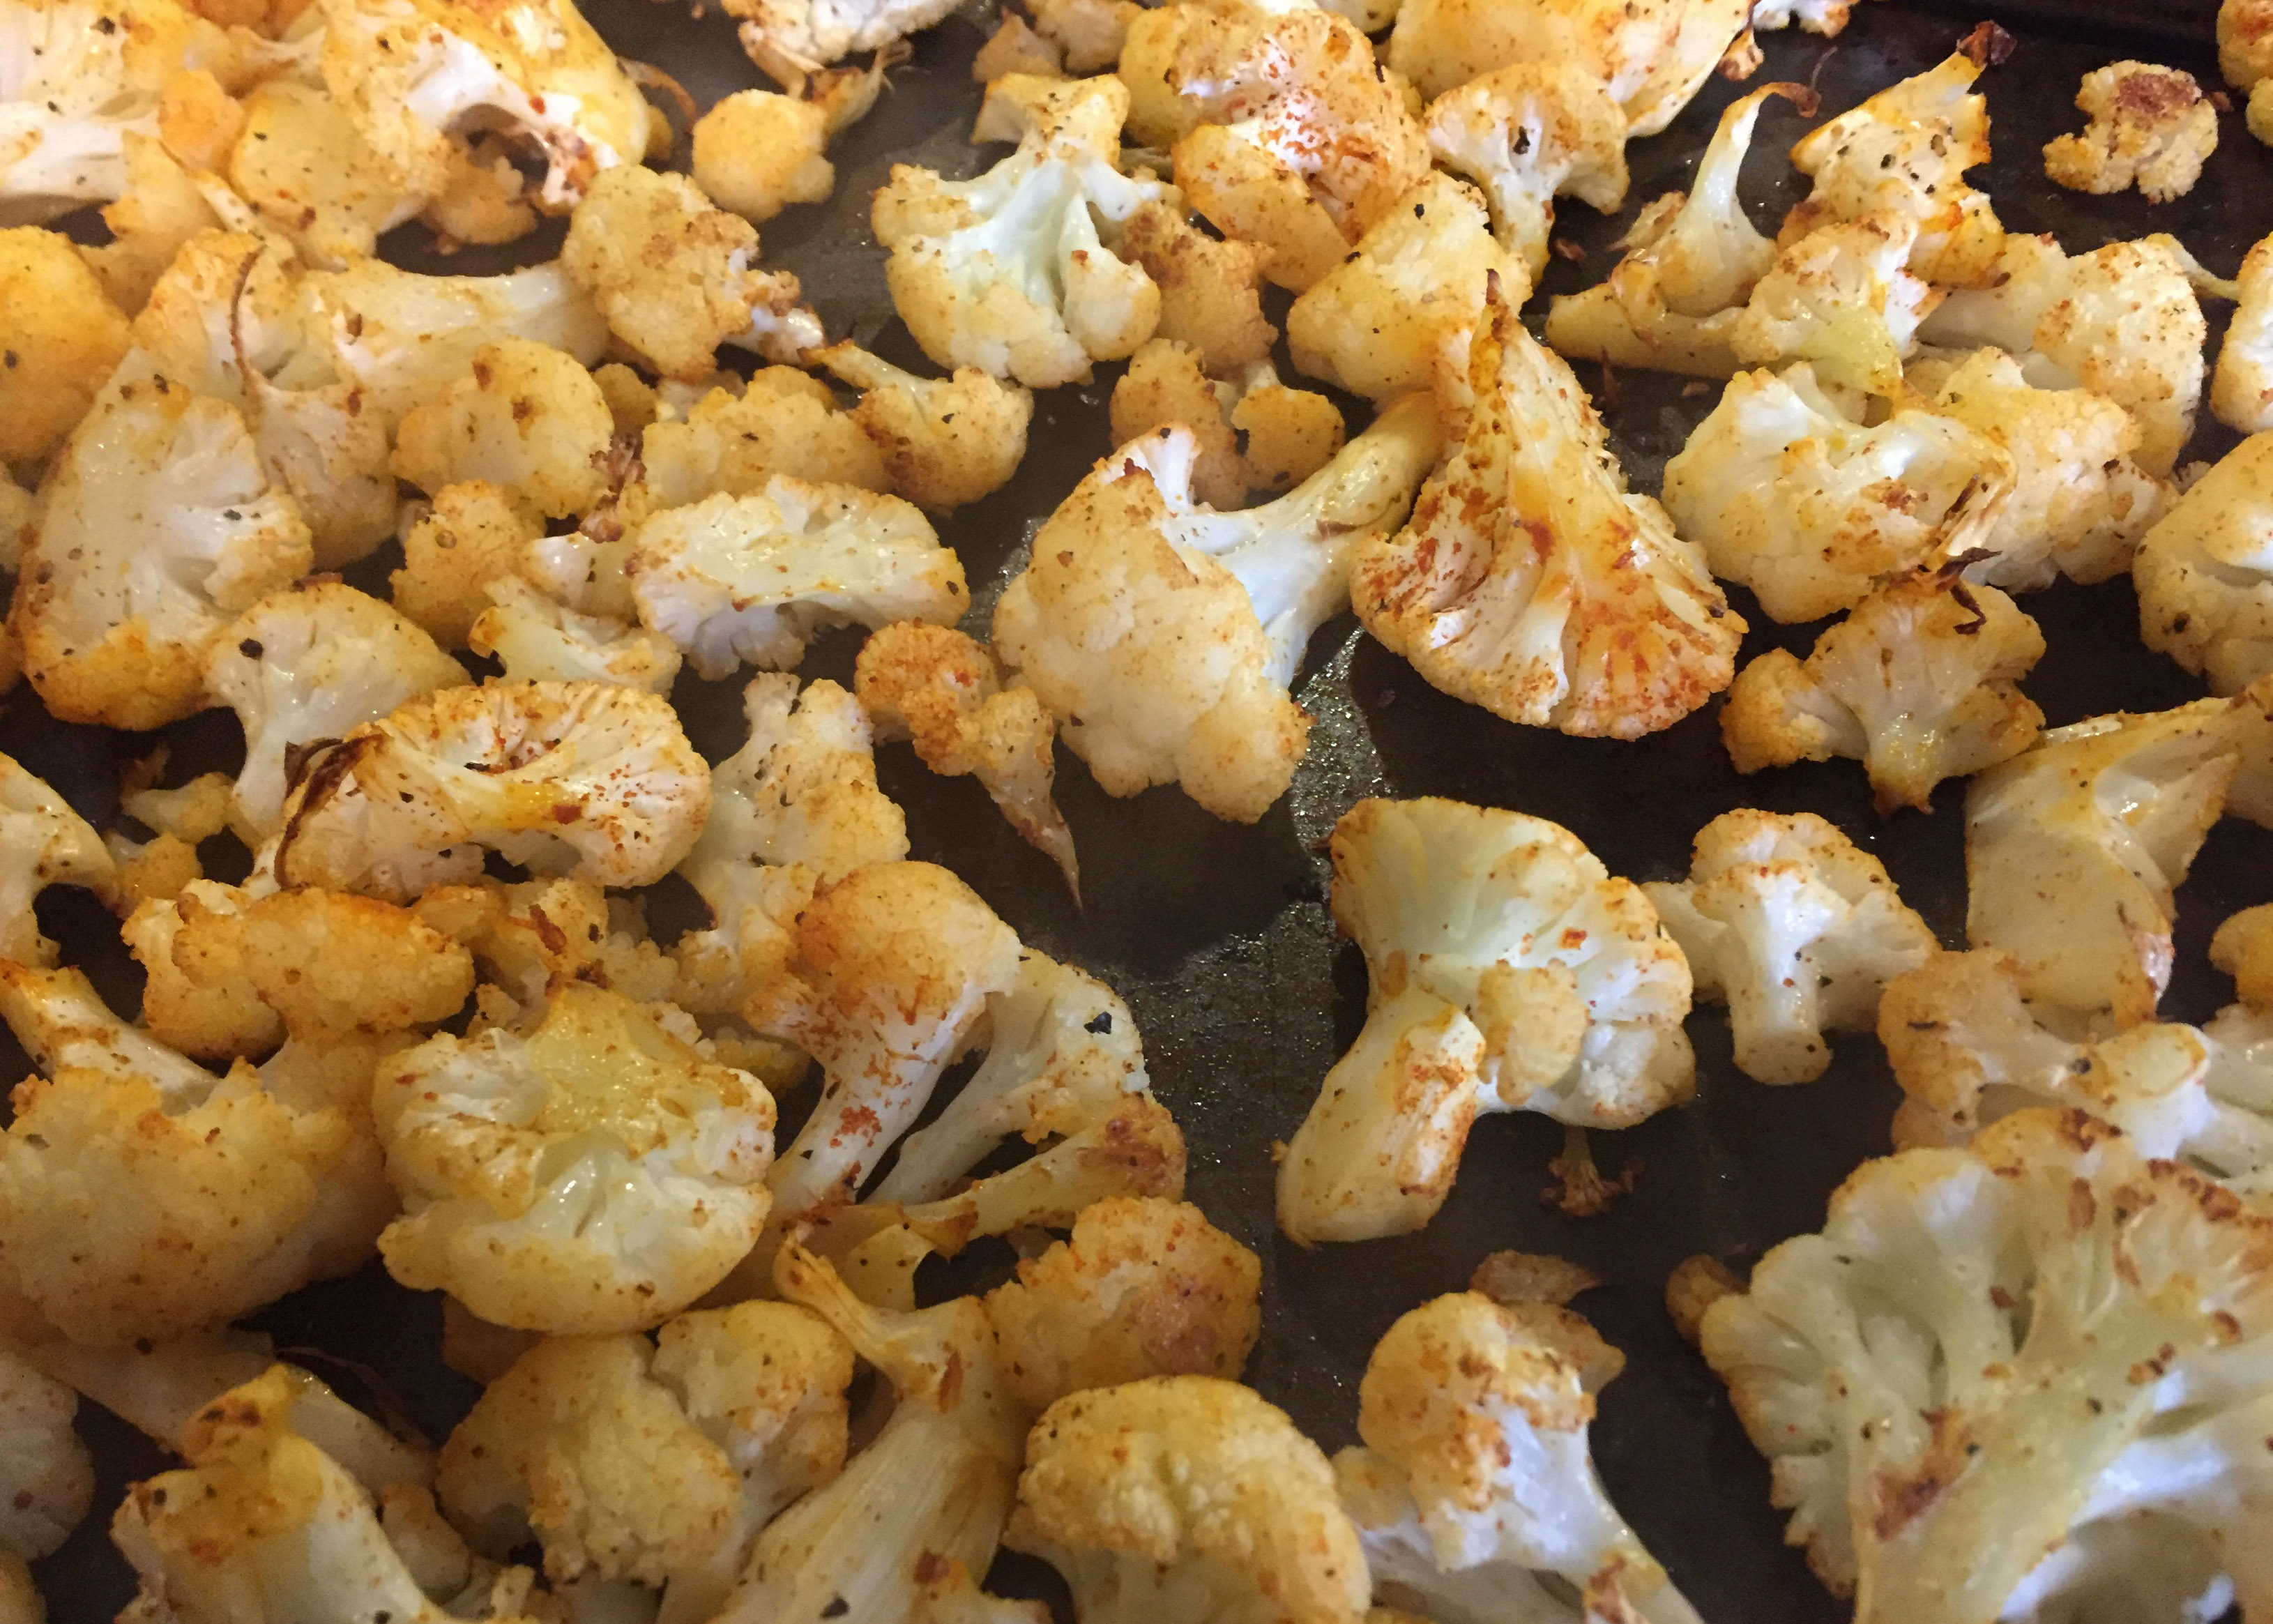
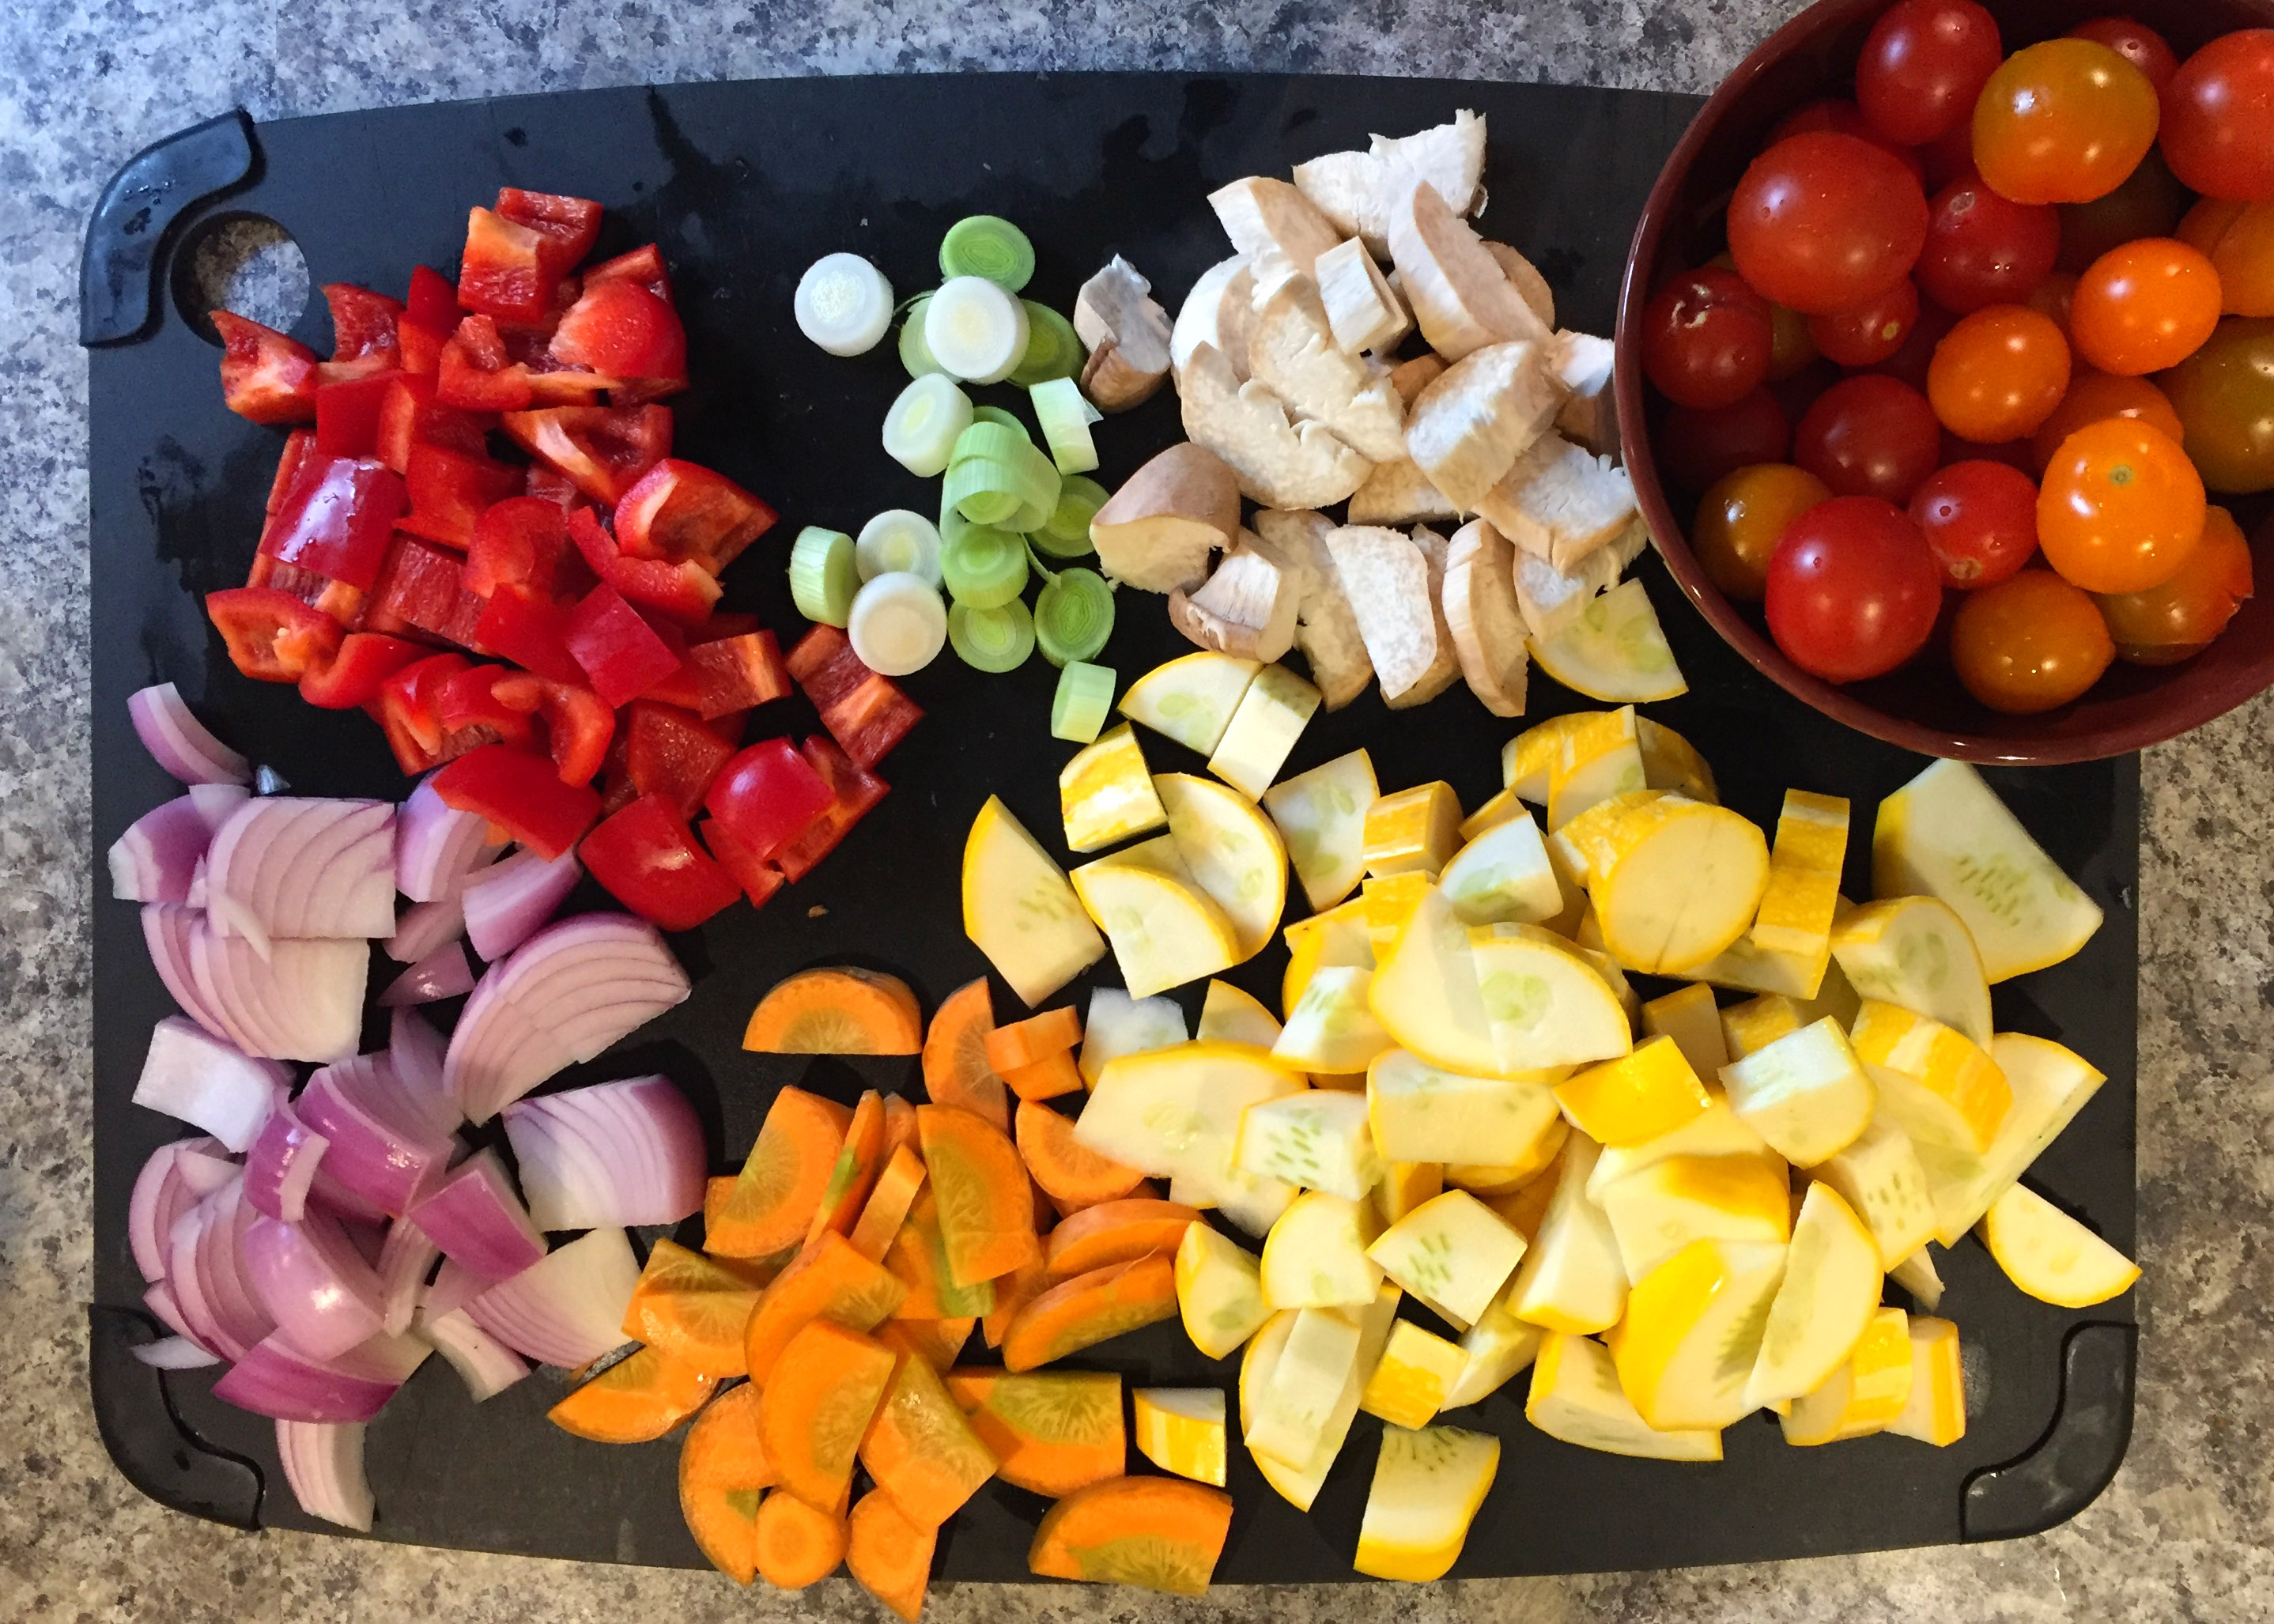
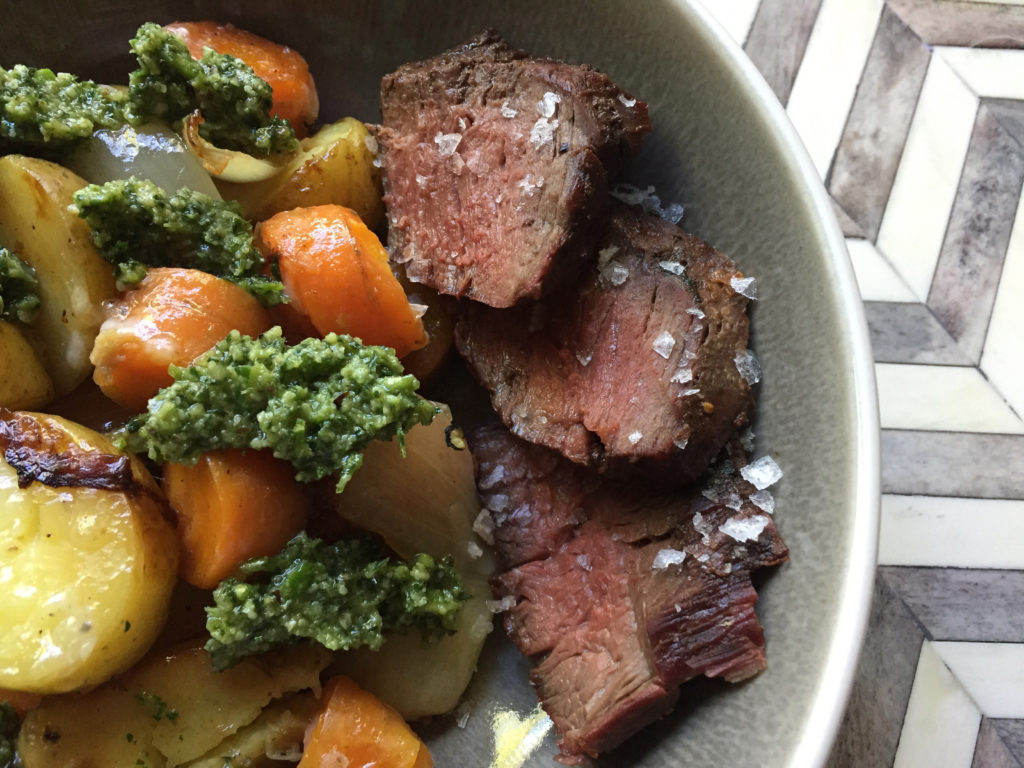
You can roast any vegetables on hand. I used new potatoes and carrots (with the tops, of course) that I picked up from the farmers’ market yesterday and added an onion for flavour. Grilling those little baby squashes would be a beautiful dish for company. You know what else would be good?… fresh shelling peas cooked for just a couple minutes and then dolloped with the pesto. And add a piece of torn burrata to that???… holy. Let your imagination run wild. :)

The veggies below fed Husband and I. Increase the amount depending on how many you want to serve. The recipe makes about one cup of pesto which is enough for 4-6 servings. I plated this in a bowl with slices of grilled steak on the side and it was perfect.

For the pesto:

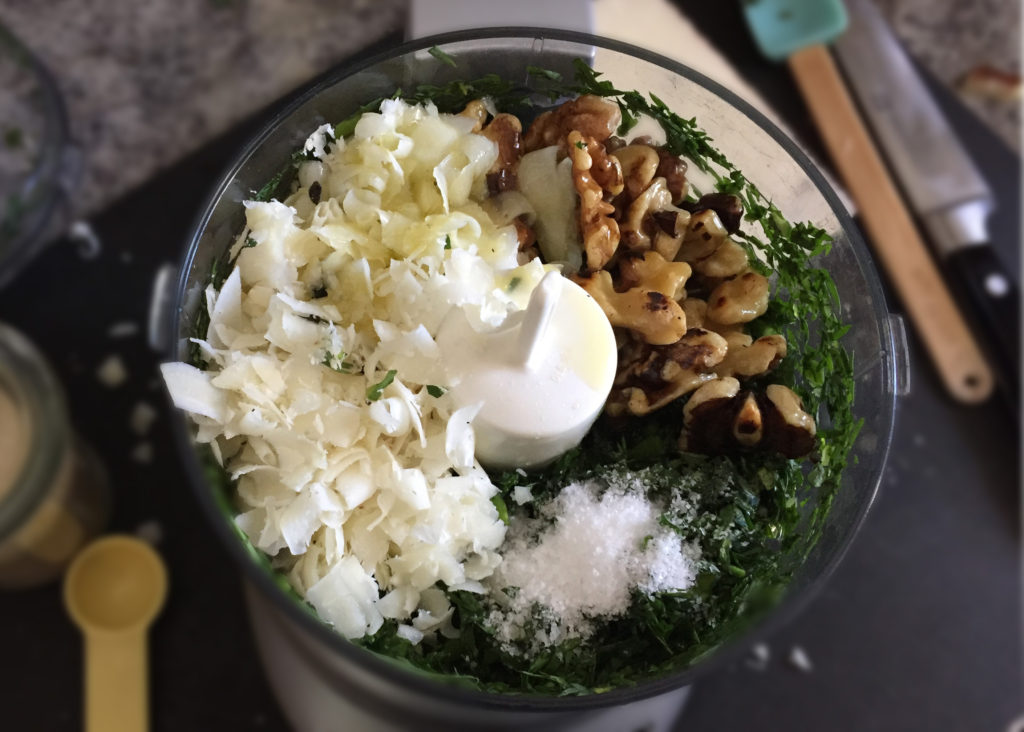
2 cups lightly packed washed carrot tops, stems discarded, roughly chopped
3-4 garlic scapes, roughly chopped
1/3 cup walnuts, toasted
1 ounce grated Pecorino or Parmesan cheese
1 teaspoon kosher salt
1/2 cup good quality fruity olive oil

Combine the carrot tops and scapes in a food processor and pulse a few times. Add the remainder pesto ingredients (except olive oil) and pulse again until well combined (about 20 times, you may have to stop to scrape down the sides a few times). Add the olive oil and process until creamy. Taste and adjust for seasoning.

For the roasted vegetables:

1/2 pound new potatoes
1/2 pound new carrots
1 large sweet or other onion
glug of olive oil
salt and pepper to taste
grated Pecorino or Parmesan to finish

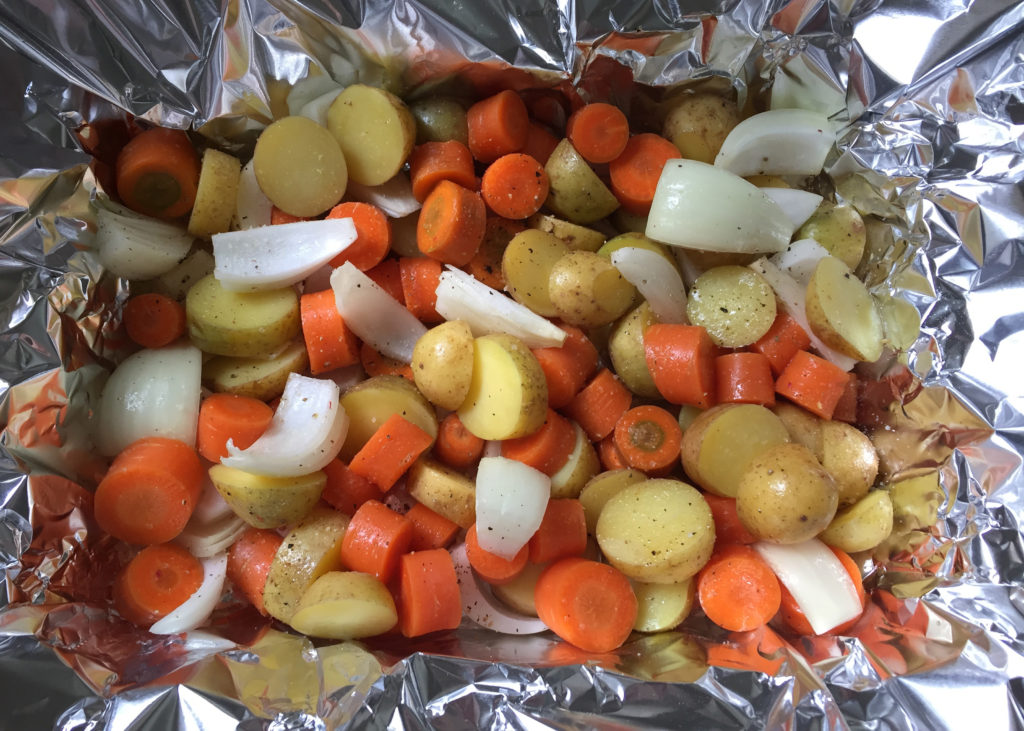
Preheat BBQ grill (or oven) to 350-400F. Cut the potatoes and carrots into large bite size pieces. Chop onion into large chunks. Combine everything in a bowl with a glug of olive oil, salt and pepper. Tip into a disposable aluminum tin and cover with tin foil or wrap in tinfoil package. Place on the BBQ and roast until the vegetables are tender… about 45 minutes.

Serve the vegetables with a grating of Pecorino or Parmesan and dolloped with the pesto.

Quick & Dirty: Blistered Green Beans with Miso, Lime and Gochujang

Although the weather the past couple weeks has gone from “summer” back to “drizzly West Coast spring”, I know summer will be back again because green beans are just starting to show up at our local markets. I smoked a small brisket yesterday for dinner and threw together this side dish in literally 10 minutes. And was it fantastic. Fresh and zesty from the lime, loads of umami flavour from the miso, a little bit of spice from the gochujang, all slightly mellowed by a touch of honey.

Heat a cast iron pan or thick bottomed frying pan (not non-stick) over medium high heat with just a swipe of canola oil covering the bottom of the pan; you don’t need much, you’re basically dry-frying the beans. Don’t use olive oil as you need a high smoke point. Throw your beans into the hot pan and let them sit for a couple minutes without stirring so they start to blister. Toss (or if you’re using cast iron which is too heavy to toss, stir) your green beans every few minutes until they are lovely and blistered and done to your liking. For me this took about 10 minutes. Remove from heat and let sit a minute before tossing with the sauce or it will burn in the hot pan.

While the beans are cooking, mix together the sauce ingredients. It will be quite thick and cling to the beans nicely. I didn’t use any salt as the miso paste is salty enough. The measurements below makes enough for about a pound of beans. Enjoy!

Note: I’m really loving these “Quick & Dirty” posts, aren’t you? Much quicker to write so I get to visit you more often and much closer to the way real people cook. If you don’t have lime, try lemon. If you can’t find gochujang, throw in a pinch of red pepper flakes. Don’t have green beans in your crisper?, try it with broccoli (including the stems!). It’s all good :)

1 lb green beans, washed and stemmed

1 TBS white or light miso paste
juice and zest from 1 small lime, or 1/2 large lime (about a generous tablespoon or so)
1 clove garlic, minced
1 tsp honey
1 tsp gochujang (Korean fermented red chili paste)

Quick & Dirty: Fennel Orange Salad

I haven’t always been a fan of fennel. The thought of that licorice-y flavour in my food just seemed, well, weird. In the past year, though, it has not been uncommon to find it in my crisper. Why? Because I tried it. Yep, me who preaches about trying everything really didn’t try fennel. I really started using it regularly after I made this… then this. Last week I made a yummy sausage, fennel and white bean spring stew. And last night instead of cooking the sucker I made a salad that I know will become a regular around here… fennel orange salad. I dare you.

This is a Quick & Dirty recipe so I didn’t measure exactly. And except for the two main ingredients (fennel and oranges) I really just tossed in what I had in the fridge. I had a large bag of oranges sitting on the counter but you could even substitute canned if that’s what you have. And I forgot to sprinkle the couscous over the first serving of the salad (Husband going up for seconds: “What’s in the pot?”… arghhhhhh) so I’m calling that optional. You can switch out the the arugula for another salad green, change the pepitas (pumpkin seeds) to another seed or nut, sub in a different cheese, and/or switch the grain to farro or quinoa. Whatever floats your boat.

I had planned on serving this with grilled squid for some protein but ended up searing a sous vide smoked pork shoulder steak that I had in my freezer and adding a couple slices on the side. Sausage would be yummy as well.

Throw the fennel, oranges, arugula, mint and cilantro into a large bowl. Toss with about half the vinaigrette, adding more to your liking. Sprinkle over pepitas, feta, and couscous. Serve with a protein to make a meal.

handful of cilantro leaves
TBS or so chopped fresh mint
2 large handfuls of baby arugula
3 oranges, zested (set aside to add to vinaigrette) then peeled and sectioned, each section cut in half
1 fennel bulb, halved and thinly sliced
1/2 cup pepitas
1/2 cup crumbled feta
1 cup cooked couscous (about 1/3rd cup from dry)

Orange Lime Vinaigrette
juice from whole juicy lime (2-3 TBS)
1 TBS orange zest, more or less to taste
1-2 tsp honey, more or less to taste
1 tsp dijon mustard
salt & pepper, to taste
pinch of red pepper flakes (I used Korean gochugaru which has a lovely fruity element)
good quality olive oil to emulsify (about 1/3rd cup)

Put all ingredients except oil in a bowl, whisk in oil in a thin steady stream until dressing starts to thicken. Taste and adjust seasoning.

Quick & Dirty: Warm Fried Chickpeas With Tons of Herbs

Welcome back to Q&D! After eating meat a couple nights in a row I had a craving for something fairly healthy and lighter tasting. I love cooking up dried beans in my pressure cooker so I whipped up a batch of chickpeas. When I cook my chickpeas I add a teaspoon of Better than Bouillon to the water along with a couple smashed garlic cloves and a bay leaf. It adds a bit of flavour to the chickpeas and the extra broth drained from the chickpeas at the end is delicious. I freeze it and use in place of stock or broth for soup, stew, cooking grains and rice, etc.

Sooooo, quick & dirty! Make sure your beans are well dried. I put mine on a sheet pan lined with a clean tea towel and let them sit for a couple hours, shaking the pan a couple times to move them around. They won’t crisp up in your frying pan if they are wet. Wash your herbs and green onion, chop ’em up and toss them in a big bowl. Melt some sort of fat in a non-stick frying pan. I used leftover fat drained from the beef ribs I smoked the other night which added a nice flavour. Add your cooked or canned chickpeas (or other beans!) to the frying pan and fry over medium to medium-high heat for about 15 minutes (tossing every few minutes) until they start to get crispy. I had a lot of beans. If you have less it may not take 15 minutes. Stir in garlic, lemon zest, chili flakes and salt to taste. Tip the beans into your bowl with the herbs and squeeze over the lemon juice. Toss and re-season to taste. We ate these “as is” but if you want to make a real meal of it top with a fried or poached egg. I wouldn’t say no to a nice big piece of soft bocconcini or burrata torn over the top either, or even crumbled feta. Go for it :)

1½ cups dried chickpeas, soaked overnight in water then simmered until tender
– OR 2 cans of drained and rinsed chickpeas, WELL DRIED
2 cups (more or less) chopped mixed herbs such as parsley, cilantro, basil, mint
1-2 green onions, sliced diagonally
1-2 garlic cloves, minced
couple shakes of chili flakes
1 lemon, zest and juice
Salt
about 1/4 cup vegetable or olive oil or some other sort of fat (schmaltz would be yummy as well)

Kuku Cauliflower Cake

cauliflower-cake5I have always loved breakfast for dinner so the other day when I was searching for a way to use up a head of cauliflower and ran across an Ottolenghi recipe for cauliflower cake (sort of an omelet/frittata with flour), it was a no-brainer to use that as a springboard recipe. There are a number of different versions on the internet and after reading some of the reviews (most complaints were about it being a bit bland) I decided to amp up the flavour by roasting the cauliflower with smoked paprika instead of simply boiling, and subbing in a bunch of parsley and cilantro for the basil as a nod to the “kuku” which is sort of the Persian version of an omelet with a ton of herbs. I also replaced part of the onion with leek because, fall garden cleanup. It’s a bit of a mess of different dishes but the end result is a somewhat dense, delicious… ermmmm… “thing” which fed us two nights in a row alongside a salad.

1 medium cauliflower (1 1/2 – 2 pounds)
glug olive oil
1 tsp smoked paprika
salt and pepper to taste

2 cups sliced leeks (white and light green part only) OR 1 large onion, peeled and diced, or a mix of both
4 TBS olive oil
1 tsp finely chopped rosemary or Herb de Provence mix
1 clove garlic, finely chopped

6 large eggs
1 cup flour (125 grams)
1 1/2 tsp baking powder
1/2 tsp ground turmeric
salt and pepper
1 cup grated pecorino cheese (or other hard strong cheese, such as parmesan or gruyere)
handful chopped parsley leaves
handful chopped cilantro leaves

Butter, for greasing pan
1 TBS kalonji or nigella seeds (or substitute white or black sesame or poppy seeds, or a mix of any of those)
1 shallot, peeled and thinly sliced (or reserve a couple slices from your onion above) for decorating the top

Preheat oven to 400F. Break cauliflower into smallish florets. Drizzle with a generous glug of olive oil and sprinkle with paprika, salt and pepper. Spread onto lightly oiled baking sheet and roast for 20 minutes, tossing a couple times during cooking. Remove from oven and let cool.

cauliflower-cake1

Heat 4 TBS olive oil in a frying pan over medium heat and fry onion and rosemary until very soft, about 8 minutes (it may seem like a lot of oil but this is also the oil you are adding to your cake, we are just nicely flavouring along the way!). Add chopped garlic and fry 1 minute more. Remove from heat and let cool.

cauliflower-cake2

Crack eggs into a bowl along with 1/4 cup of milk and whisk well. In a another large bowl blend the flour, baking powder, turmeric, 1 teaspoon salt, and plenty of pepper. Add egg mixture and whisk until fully incorporated and mostly smooth (don’t overmix or your cake will be tough). Stir in onion filling, herbs and cheese until well blended. Gently fold in the cauliflower, trying not to break up the florets.

cauliflower-cake3

If you are not using a non-stick pan, line the bottom of an angel food cake pan or 7-8 inch springform pan with parchment paper. Butter the sides generously and toss the kalonji seeds (or whatever you are using) in the pan so they stick to the sides. Gently spoon or pour in cauliflower batter and scatter shallot or onion slices on top. Bake in the centre of the 400F oven until the top is golden and the centre of the cake is set. This should take about 30 minutes if you are using an angel food cake pan or 40 minute for a springform pan.

cauliflower-cake4

Let cool to warm or room temperature. Run a knife along the sides of the pan to remove. We ate this alongside a cucumber and tomato salad tossed with a simple vinaigrette.

cauliflower-cake6

Beet Galette

beetgalette7A friend from culinary school emailed me a while back to chat (mainly about food) and mentioned she was having guests over that night and was making spanakopita.

ARRRGHHHH. Cue the monster craving! Does that ever happen to you? You are going along minding your own business and then, BAM… you spot a kid eating an ice cream cone and you’re not much into ice cream but you LOVE crunchy and salty so you start thinking about potato chips but those aren’t “appropriate” for dinner so you imagine all the salty crunchy foods you could actually eat for dinner without attracting the attention of the food police and your mind wanders through the possibilities of nachos, homemade french fries, deep fried onion rings, fried chicken, fried chicken and bacon(!) and so on and so on…

So, yup… that happened. Now I had spanakopita on the brain but no filo dough and no spinach. My mind started twirling with ideas. Could I make spanakopita with pastry dough sort of like a hand-held pie instead of the light and crispy filo dough? But no, that would be waaaaaay too heavy. What if I did it open faced (half the pastry!) but instead of a pie, I made a galette? And could I use something from my garden instead of spinach? What about beet greens? And HOOOOOLD ON… what if I used the beets as well?!? \Whoa lady, this could be good!

beetgalette1

After mulling it over a few days (craving still burning hot), I decided to add onions to cut the sweetness of the beets and throw in some feta (my “nod” back to the original spanakopita idea). The end result was, if not one of the tastiest experiments I have ever embarked on, definitely one of the prettiest!

I used my new pressure cooker to cook the beets (15 minutes!) but it is very easy to boil or roast them… just takes a bit longer.

The dough is my usual recipe which you can find here except I subbed in whole wheat flour for half the white. You can use any pie crust dough you are comfortable with. You will need enough to make one round about 14-15 inches across and slightly thicker than 1/8th inch.

Pie crust dough to make one round 14-15 inches across
1 generous pound beets
8 cups beet greens, washed
2 cloves garlic, sliced
Couple glugs olive oil
1 medium onion, halved and thinly sliced
couple sprigs fresh thyme
salt and pepper to taste
pinch red pepper flakes
3 oz feta, crumbled
1 egg
1/4 cup cream
Optional: 1 additional egg whisked with water to brush pastry if you want that shiny look

To make the filling, cook the beets to your liking (boil, bake, or in a pressure cooker). Once cooled enough to handle, peel and slice into 1/4 inch slices. Set aside.

Wash beet greens, do not dry. Warm a glug of olive oil and garlic in a large pan over medium-high heat. Add beet greens and toss until wilted, about 3 minutes. Drain and set aside in a bowl.

beetgalette2

Heat another glug of olive oil in the same pan you used for the beet greens. Add onions and fresh thyme. Fry until starting to turn golden, 7-8 minutes. Discard thyme and add onions to the beet greens.

beetgalette3

Add crumbled feta and pinch of red pepper flakes to the filling. Season with salt and pepper.

beetgalette4

Assemble the galette:

Preheat oven to 375F.

Roll out dough on a clean, lightly floured piece of parchment in a circle about 14-15 inches across and slightly thicker than 1/8th inch. No worries if the dough goes over the edges as you will be folding it up over the galette shortly. Spoon approximately half the beet green/onion mixture in a circle evenly in the centre of the dough, ensuring you have a good 2 inch border all around the edge. Top with beets overlapping the slices in circles. Finish with the remaining beet greens. Fold the edge of the dough up and over the filling, overlapping where necessary and press down lightly to create the folds.

beetgalette5

beetgalette8

Slide the parchment with the dough onto a cookie sheet. Whisk the egg yolk and cream together and pour into the centre of the galette. If you would like the pastry to be shiny, brush the border with the egg wash and sprinkle with flake sea salt.  Place in oven and bake 35-40 minutes until crust is golden. Remove and let sit for 5 minutes before slicing. We ate this as our main course but a smaller wedge alongside a leafy salad would be a lovely first course.

beetgalette6

Confit Tomatoes

tomato confit3Winter is coming.

Sigh.

I am trying desperately to hang on to the last days of summer and preserve some of its goodness to take with me into the dreary cool days ahead. My garden is bursting with at least 5 different varieties of beautiful little tomatoes that are as sweet as candy! Sungold, Sun Sugar, Black Cherry, Sweet Baby Girls, and Indigo Rose… those are the ones I planted this year. Then there are the ones I can’t identify from last year. While we were away the tomatoes ripened, fell and rotted into the garden and magically I had about 376 (not exaggerating) “volunteers” pop up this spring. I pulled about 370 and let the remaining ones live just to see how they would do. Guess what? They did just as well as the ones I had babied from seed under grow lights since March. (I’m tempted to use this method to grow ALL of my tomatoes next year.)

Anyway, we have been eating bowlfuls of these bursts of sunshine every single night but we can’t keep up. I first tried this method of preserving tomatoes about 3 years ago and now wouldn’t do anything else. A slow roast in the oven melts those puppies into a glorious mess of sweetness and softens and mellows the garlic… mmmmmm, sorry, drooling all over my keyboard here.

Read more

Summer Stew

veg stew4Well that doesn’t sound very tasty. Summer stew? Hmmmph.

Wait! Don’t go yet!! It’s not as dull as it sounds!

My garden is overflowing with gorgeous little tomatoes as sweet as candy, summer squash, carrots, garlic, leeks and a variety of herbs. I wanted to use up a bunch at once and I’m sort of over grilled vegetables for a while. This stew was just the ticket. It is very lightly seasoned which allows the fresh vegetables to shine. I had some leftover bits (a few mushrooms and a cup of corn kernels) hanging around the fridge which I threw in as well but those ingredients are optional… use what you have! We ate this spooned over quinoa and it was a lovely summer meal, even if it was *stew.

*this reminds me of a story. I invited a friend over for dinner many years ago and told her I would make curry. She told me she hated curry. Really? Why do you hate curry?! It turned out that when she was little her mother would clean out the fridge every Friday and throw all the leftovers into a pan, heat it up, and call it curry. My curry was not THAT curry, and this stew is not a mash of overcooked vegetables… really.

veg stew1

1 cup quinoa, cooked according to package directions
2 TBS olive oil
2 yellow squash (or zucchini)
1 red onion
1 red pepper
1 large or 2 small carrots
1 leek
2-3 garlic cloves
1 generous pint of small tomatoes
couple sprigs of fresh dill (to taste)
1/2 cup vegetable or chicken stock
1/2 tsp ground cumin
1/2 tsp ground fennel
pinch red pepper flakes
salt and pepper to taste
handful of fresh chopped herbs (I used basil and shiso leaf)
grated pecorino or parmesan to garnish
Optional:
mushrooms (I had a few hanging around my fridge)
Corn kernels (I had about a cup leftover from making this salad the previous night)

Cook quinoa according to package directions (I usually use 1:1 seed to water or stock ratio, plus a quarter cup of liquid “for the pot”).

Cut squash, onions, and red pepper into bite size chunks. Slice carrots, leeks (and mushrooms if using). Mince garlic and chop fresh dill.

veg stew2

Heat 2 TBS olive oil in a frying pan. Add carrots and red onion and fry until starting to soften, about 3 minutes. Add red pepper and leeks and continue to fry until starting to soften, about 3 minutes. Add squash (and mushrooms if using) and continue to fry until starting to soften, about 3 minutes. Add tomatoes, dill, stock, and spices and continue to cook until tomatoes have started to break and release their juices and veggies are done to your liking… mine took about 5 minutes more.

veg stew3

At this point you can also throw in any leftovers you have in your fridge to re-warm. I had a cup of corn kernels. You could also add leftover bits of protein such as sausage or shrimp, etc. Taste and season with salt and pepper. Spoon over quinoa, garnish with cheese and herbs and serve.

Watermelon Gazpacho (Summer in a Bowl)

watermelon gaz6I know some East-Coasters have been suffering through a very hot summer but I couldn’t help feel just a little bit jealous as I sat in the searing +18C degree heat (can you hear the sarcasm?) of a very mediocre June and somewhat mediocre July. Then suddenly, summer arrived the first few weeks of August. And although it’s gone again now (arrrghhhh fall… really?!?!) I am harkening back to the days of two weeks ago when all was merry and bright and beautifully WARM. I’m talking “no sweater required at 9:00pm WARM”. Not this ridiculous “oh the sun has gone behind a cloud where the heck is my jacket” weather.

The good weather was a blessing a few weeks ago when I planned an outdoor dinner that put many of my newly learned culinary school skills to the test. Six courses, several consisting of two or three separate main elements and a number of different garnishes. It was fun, stressful, and a good learning experience. The third course was my lifeline as it was prepared the day before (no last minute fussing) and simply garnished with toasted almonds. It gave me a breather in the middle of the meal and provided a wonderful palate cleanser. It is none other than… TA DAAAAAA… watermelon gazpacho!

Read more

Zucchini Gratin

zucchini gratin3I’ve never been a fan of zucchini but I somehow got suckered into buying it at the local farmers’ market last weekend. They then languished in the crisper for another 4 days until I could no longer ignore them. Ugh. Stupid beautiful fresh garden vegetables… what the heck am I going to do with you?!?!

I went hunting online for zucchini recipes and found tons for salad (boring), fried (they’ll never become crispy… I don’t believe you), and muffins and breads (but I don’t waaaant to add sugar to vegetables), and then… gratin. Hmmmmm, what do I think about gratin? Add cheese to vegetables, bake until it melts together into dreaminess then top with cheesy, crunchy deliciousness?? SOLD!

Read more